Showing posts with label Android Restore Factory Code. Show all posts

Monday, May 11, 2015

How to Root Note 3 SM-N900 5.0 Install Recovery Download

(Guide) Root Note 3 SM-N900 5.0/Install Recovery

Here is a full guide on how to root and install custom recovery on Galaxy Note 3 N900 Lollipop

(THIS WILL VOIDE WARRENTY,I AM NOT RESPONSIBLE FOR IF YOUR DEVICE BRICKED)

How to do root:

NOTE 1- MAKE SURE YOU DOWNLOAD THE FILE FOR YOU CORRECT ROOT FILES, THE FILES ARE DIFFERENT FOR 4.4.2 AND DIFFERENT FOR 5.0

NOTE 2- IF YOU KNOW YOU WANT TO FLASH A ROM THEN NO NEED TO ROOT YOUR DEVICE, SKIP THIS AND GO TO HOW TO INSTALL CUSTOM RECOVERY!

Step 1)Get the CF root file compatabile to your vairant from here.. http://forum.xda-developers.com/show. php?t=2466423

Step 2) Turn OFF your mobile and go to Download Mode by pressing and holding the Volume Down + Home Buttons together for few seconds followed by Power button then proceed with volume up.

Step 3) Now open ODIN on your PC and connect your Galaxy Note 3 to your computer.

Step 4) Once your phone is successfully connected to your PC, the ID:COM box on ODIN will turn blue (or yellow) and will show the COM port number.

Step 5) Click on pda in odin (if odin 3.09 choose AP) and choose the ".tar" file.

Step 6) Tick "Auto Reboot" and "F. Reset Time" options and make sure that "Re-Partition" is unchecked
!!!!DO NOT CHECK "Nand Erase All" IN ANY WAY!!!!

Step 7) Click on Start button in ODIN window to start the flashing process. The process will take few minutes to complete.

DO NOT UNPLUG USB CABLE WHILE EXECUTING THE PROCESS, YOU MAY BRICK YOUR PHONE!

Step 8) When the installation is completed, you read a "Reset " then a "Pass". your phone will restart

How To Install Custom Recovery
Download The Recovery Image You Want
For TWRP:
Download TWRP IMG From Here:

http://dl.twrp.me/ha3g/

(I dont have other recovery img links.. its your homework :P)

After downloading go to playstore and download :

Flashify: https://play.google.com/store/apps/d...flashify&hl=en

AFter Installing Flashify Open it and grant SuperSu Permission

Then Choose: Recovey Image

Then: Choose A File And browse the twrp.img file you downloaded and Select it and select yup..

It Will Flash TWRP For Your Phone
And Then Select Reboot.. It Will Reboot Into TWRP Recovery
ROCK AND ROLL NOW


Credits:
@CF-Auto-Root
@TWRP Recovery
Attached Thumbnail

For more Information

HOW TO ROOT MICROMAX A102 DOODLE 3 WITH SP TOOL

Rooting Micromax Canvas Doodle 3 A102 with 1GB RAM Kitkat 4.4.2


Download recovery.img


You Need SP_Flash_Tool_v5.1352.01.zip
and UPDATE-SuperSU-v2.02.zip
Download below
put UPDATE-SuperSU-v2.02.zip in your SD Card

Now extract Sp Flash Tools and download Scatter File from Below

1. Open Sp Flash Tools
2. Put Scatter file and recovery.img in same folder
3. Load Scatter File Downloaded from below
4. now the recovery will be automatically selected
5. Install Drivers from here micromaxinfo.com/download.ashx?section=mobile-A102&file=Canvas_Doodle_3_Driver.zip
6. Switch off your Phone Pull out Battery and Connect it to PC using USB Cable
7. Click on Download
8. After the process is completed a green tick will appear
9. Now disconnect mobile and Put battery in and goto recovery mode using volume up+Power button select recovery and then push vol Down button
here is your custom recovery now select install zip from sdcard using power up and down buttons and select from power button
Now a prompt will appear select yes.
Now go back using soft keys on your mobile and reboot ..


Here you are
Your Phone is Rooted Now..
Attached Files
File Type: txt MT6572_Android_scatter.txt -
File Type: rar USB_Drivers_MMX_A110Q.rar -
File Type: img recovery.img -
File Type: zip UPDATE-SuperSU-v2.02.zip -

More information 

Monday, March 16, 2015

How To Remove Pattern Lock From All Sony Xperia Without Flash

How To Remove Pattern Lock From All Sony Xperia Without Flash
All sony Xperia lock code Remove in 5sec without full flash


1How To Hard Reset Sony Xperia T2 Ultra Dual D5322Click Here
2How To Hard Reset Sony Xperia T3 D5102Click Here
3How To Hard Reset Sony Xperia T3 D5103Click Here
4How To Hard Reset Sony Xperia X10iClick Here
5How To Hard Reset Sony Xperia X8 E15iClick Here
6How To Hard Reset Sony Xperia X8E 15aClick Here
7How To Hard Reset Sony Xperia Z LTE C6603Click Here
8How To Hard Reset Sony Xperia SP C5303Click Here
9How To Hard Reset Sony Xperia Z Ultra C6833Click Here
10How To Hard Reset Sony Xperia Z1 C6903Click Here
11How To Hard Reset Sony Xperia Z1 Compact LTE-A D5503Click Here
12How To Hard Reset Sony Xperia MT Dual D2302Click Here
13How To Hard Reset Sony Xperia Z3 Compact LTE-A D5803Click Here
14How To Hard Reset Sony Xperia Neo MT11iClick Here
15How To Hard Reset Sony Xperia Z3 D6653Click Here
16How To Hard Reset Sony Xperia Zl C6503Click Here
17How To Hard Reset Sony Xperia Z1 C6602Click Here
18How To Hard Reset Sony Xperia Z2 D6503Click Here
19How To Hard Reset Sony Xperia Miro ST23iClick Here
20How To Hard Reset Sony Xperia C3 D2533Click Here
21How To Hard Reset Sony Xperia X10 Miny pro U20aClick Here
22How To Hard Reset Sony Xperia E C1504Click Here
23How To Hard Reset Sony Xperia E C1505Click Here
24How To Hard Reset Sony Xperia  E Dual C1604Click Here
25How To Hard Reset Sony Xperia E Dual C1605Click Here
26How To Hard Reset Sony Xperia E1 D2005Click Here
27How To Hard Reset Sony Xperia E1 Dual D2105Click Here
28How To Hard Reset Sony Xperia Go St27iClick Here
29How To Hard Reset Sony Xperia L C2105Click Here
30How To Hard Reset Sony Xperia Play R800iClick Here
31How To Hard Reset Sony Xperia M C1904Click Here
32How To Hard Reset Sony Xperia M C1905Click Here
33How To Hard Reset Sony Xperia M Dual C 2004Click Here
34How To Hard Reset Sony Xperia M Dual C2005Click Here
35How To Hard Reset Sony Xperia M2 Aqua LTE A D2403Click Here
36How To Hard Reset Sony Xperia M2 D2303Click Here
37How To Hard Reset Sony Xperia M2 Dual D2302Click Here
38How To Hard Reset Sony Xperia J ST26iClick Here
39How To Hard Reset Sony Xperia Mini Pro Sk17iClick Here
40How To Hard Reset Sony Xperia L C2104Click Here
41How To Hard Reset Sony Xperia ST23iClick Here
42How To Hard Reset Sony Xperia E C1505Click Here
43How To Hard Reset Sony Xperia E C1504Click Here
44How To Hard Reset Sony Xperia P LT22iClick Here
45How To Hard Reset Sony Xperia Zr C5502Click Here
46How To Hard Reset Sony Xperia C3 Dual D5502Click Here
47How To Hard Reset Sony Xperia C3 D5533Click Here
48How To Hard Reset Sony Xperia X10 Mini Pro U20aClick Here
49How To Hard Reset Sony Xperia T LT30PClick Here
50How To Hard Reset Sony Xperia X10aClick Here
51How To Hard Reset Sony Xperia T2 Ultra Dual D5322Click Here
52How To Hard Reset Sony Xperia E3 Dual D2212Click Here
53How To Hard Reset Sony Xperia D3 D5 103Click Here
54How To Hard Reset Sony Xperia WT19iClick Here
55How To Hard Reset Sony Xperia WT19aClick Here
56How To Hard Reset Sony Xperia Tipo ST21iClick Here
57How To Hard Reset Sony Xperia U ST25iClick Here
58How To Hard Reset Sony Xperia Ultra C6802Click Here
59How To Hard Reset Sony Xperia LT29iClick Here
60How To Hard Reset Sony Xperia S LT26iClick Here
61How To Hard Reset Sony Xperia E C1505Click Here
62How To Hard Reset Sony Xperia P LT26iClick Here
63How To Hard Reset Sony Xperia E C1505Click Here
64How To Hard Reset Sony Xperia P LT22iClick Here
65How To Hard Reset Sony Xperia ARC S LT18iClick Here
66How To Hard Reset Sony Xperia C C2305Click Here


For More Sony Model Hard Reset


Download Android App Link

Friday, March 13, 2015

How To unlock I747M 4.4.2 With Z3x Box

Selected model: I747M
Selected port: COM267 SAMSUNG Mobile USB Serial Port
Selected port speed: 115200
Searching ADB device... OK
Reading phone info...
Model: SGH-I747M
Android version: 4.4.2
Product code: SGH-I747MBBBMC
Phone version: I747MVLUFNK2
PDA version: I747MVLUFNK2
CSC version: I747MOYCFNK2
IMEI: 353323056346124
Phone S/N: R28DC09TN3E
Checking Super user right... true
Backuping MMCBLK... OK
Writing data to phone... OK
Rebooting phone... OK
Waiting phone... OK
Reading phone info...
Model: SGH-I747M
Android version: 4.4.2
Product code: Not Active
Phone version: I747MVLUFNK2
PDA version: I747MVLUFNK2
CSC version: I747MOYCFNK2
IMEI: xxxxxxx
Phone S/N: xxxDC09xxx
Bypass MSL... OK
Unlocking... OK
Reseting... OK
Unlock done
Done with Samsung Tool v.19.0
Read More

Friday, March 6, 2015

How To Root Nexus 4 / 5 / 7 and 3g Download

How To Root Nexus 4
How To Root Nexus 5
How To Root Nexus 7
How To Root Nexus 7 3g
How To Root Nexus Toro
How To Root Nexus 7 2013
How To Root Nexus 7 2013 3g
How To Root Nexus Toroplus
How To Root Nexus Maguro Yakju
How To Root Nexus Maguro
How To Lock Bootloader Nexus
How To UnLock Bootloader Nexus


RootME is a root program as the name suggests with your all Nexus devices can rooting. For example: Google Nexus 4/5/7/2013 and all Galaxy Nexus devices

Easy to Root.

HOMERestore your Device?
Check this Post   Restore

                         ANDROID MOBILE UPDATE APP
Requirements:
Windows 7 / 8 / 8.1
Net Framework 4.0 "Here"

Download:

http://crymedia.de/?cry=downloads

How to Restore for Nexus Devices Download

What is RestoreME?

With RestoreME can bring to the factory setting you your Nexus. The important thing is that is your bootloader unlocked. Then you select the device and click on RestoreME. Important, You gotta be in fastboot mode!

Devices:
Nexus 4, Nexus 5, Nexus 7,
Nexus 7 3G, Nexus 7, 2013
Nexus 7 3G 2013, Nexus 10


Easy to Restore

Root your Device:
Check this Post  ROOTING SOFTWARE

                             ANDROID MOBILE UPDATE APP
Requirements:
Windows 7 / 8 / 8.1
Net Framework 4.0 "Here"
HOMEDownload:

http://crymedia.de/?cry=downloads

Thursday, March 5, 2015

ADB, Tool Fastboot and Drivers 15 seconds ADB Installer v1.4.2 Download

15 seconds ADB Installer v1.4.2
ADB, Fastboot and Drivers

What is this?

This is All-in-One installer for 3 most needed PC tools for Android. No need to download big SDK for 3 small things. I originaly made it for my Kurdish friend AnGrY DuDe in early 2013. I saw another ADB installer on XDA, but it wasn't good enough for me so i'm finaly posting it here. It's very small and fast installer for tools and drivers.

Features:
Small - 9.18 MB
Fast - 15 seconds install (many times its even less)
AIO - ADB, Fastboot and also Drivers
Easy to install - just run it and program will guide you
Clean - ADB and Google Drivers from latest SDK


Install process:
1. Run it (Require administrator privileges)
2. Press Y/Yes to install ADB and Fastboot or N/No to skip
3. Press Y/Yes to install ADB system-wide or N/No for current user only
4. Press Y/Yes to install Drivers or N/No to skip
5. Continue Driver installation
6. 15 seconds passed - finished!

Notes:
System-wide: ADB and Fastboot are installed to %SystemDrive%\adb directory, and added system-wide path.
Current user only: ADB and Fastboot are installed to %UserProfile%\adb directory, and added path for current user.
CMD can use ADB and Fastboot from any directory.
Drivers are installed to system - no need to install them from directories.
Installer automaticly decides if install 32-bit or 64-bit drivers.
If anybody got problem with detecting device, go see picture guide howto_driver.zip
If installation fails, then post here contents of "adb-installer.log" from desktop. (if there is any)

If you have problem with driver enumeration in Windows 8.1 install update KB2917929

If you have older Google USB Driver installed, please uninstall it from Control Panel before installing new

If you have previously installed it as system-wide and now you want it current user only (or vice-versa), it won't remove it, you must do it yourself. (at least for now)


Wednesday, March 4, 2015

ANDROID MULTITOOL DOWNLOAD For Windows OS XP / 7 / 8 / 8.1

ANDROID MULTITOOL

Hello,
I´m glad to present my Android Multitool wich makes it easier to decompile/recompile applications + jar framework files. You can also sign your apk by easily clicking a button.

Requirements:
Winows OS XP / 7 / 8 / 8.1
Installed Java on Windows
Installed Microsoft Powerpacks
Installed .NET framework

- Easy handling: Select your apk and push the "decompile" button!
- This tool makes modding much faster and easier, no cmd handling any more.
- You can read the log which is integrated in the tool to find your mistake in the error.
- ADB inside: Push files into your file system with a few clicks

It looks like this so far:


How to use this tool?

Follow this small how to!


Here you go..

Well, first extract the AndroidMultitool folder to C:\. Otherwise it propably won´t work
-copy your framework-res.apk and other files you want to mod in the "Files" folder (this folder is for all your files you want to mod, don't pick files from any other location)
-Next you have to start AndroidMultitool.exe
-select your framework-res.apk and push the "install" button (check log for errors)


Decompiling and recompiling apk files:

-select the apk you want to mod/decompile and push the "decompile" button (check log for errors)
Note: You can check the "use baksmali" checkbox, then e.g. the useless .line text will be removed
-your decompiled apk will be located in C:\AndroidMultitool\Decompiled_apk"apkname" as a folder
-if you want to compile your apk again, select your decompiled folder, check the "apk" radio button and compile it again (check log for errors)

-your recompiled apk will be located in C:\AndroidMultitool\Compiled_apk"apkname"


Decompiling and recompiling jar files:

-select in the combobox ".jar" (check the "use baksmali" checkbox for deleting the useless .line comments)
-select the ".jar" file you want to mod
-push the "decompile" button
-your decompiled jar file will be locaten in C:\AndroidMultitool\Decompiled_jar"jarname"
-for recompiling you have to check the "jar" radiobutton and select the folder within your decompiled ".jar" file
-push the compile button
-your compiled jar file will be located in C:\AndroidMultitool\Compiled_jar"jarname"\classes. dex
-delete the "classes.dex" file in your ".jar" file
-copy the new "classes.dex" file you compiled in the ".jar" file


Signing apk files:

-select the ".apk" you want to sign
-push the "sign" button
-the signed apk file is located in C:\AndroidMultitool\Signed_apk"apkname_signed"


Using tags:

You want to decompile many files from different devices or different android versions / frameworks? Tagging makes it possible!
- before installing your framework type in any tag (like "hero")
- then install your framework and work normally


Android Debug Bridge

You want to push files with adb to your device? Follow these instructions:
Please klick on the "advanced" register in the tool
-push "check" to control if your device is ready
-if the device is not ready please follow the instructions, which are listed in the tool (device offline, no device...)
-if the device is ready, choose a file you want to push
-choose a path on the device, where the file should be placed later
-push the "push" Button
-alternately: press "Reboot device" to reboot your device and to let changes take effect

If there are any questions or bugs, please post them in the thread.

Follow me on Google+ : Daniel Huber


[DOWNLOAD]

Enjoy easier apk handling!

DOWNLOAD ANDROID MOBILE APP

Having issues with the program?
Try the batch version developed by @bovirus (it's also in the download folder)


Questions and answers:

Q: The programm does not start, it crashes.

A: Please install Powerpacks, this one: http://go.microsoft.com/fwlink/?Link...27&clcid=0x804


Q: What do you mean exactly with "!!!NOTE!!! After compiling you have to copy the AndroidManifest.xml and the META-INF folder from your old apk to your newly compiled one!! Otherwise you´ll get bootloop! " .. I don't understand.

A: You have to open your old apk (this one you selected for decompiling in the folder /files) and copy from that apk the AndroidManifest.xml and the META-INF folder to the apk you just decompiled and recompiled.


READ MORE

Tuesday, February 17, 2015

Android Tools PC DOS Download

One click (DOS) command
ROOT and Recovery with a single click (DOS) commands

One click (DOS) command
ROOT and Recovery with a single click (DOS) commands

Download: ROOT  (1mb) all versions at the moment.
Download: Recovery  (16mb) all versions at the moment.
Download : Password Reset
Download: Ultimate Backup Tool v 1.0 Android (0.3Mb)
Download : Android App 

The procedure is very simple, connect your phone to USB and more follow the prompts.
Good Luck!
(EN) The procedure is very simple and you do not need to Pay Money to fraudsters for the beautiful interface, Connect the Phone to the USB and then follow the Prompts. 
Good Luck!
Win All 32 \ 64

Sunday, September 14, 2014

Android Mobile Download was unsuccessful' error: Play Store Solution


Related errors from goo.gl/PT37PN Play Store:
'Download was unsuccessful.'
'Download was unsuccessful. Please try again.'
Cannot download applications from the Play Store
goo.gl/PT37PN
If you receive this error message when trying to download an application or update from Play Store, follow these steps goo.gl/PT37PN


  1. From the Home screen, press the Menu key.
  2. Touch Settings. goo.gl/PT37PN
  3. Touch Applications.
  4. Touch Manage applications.
  5. At the top of the screen, touch the All tab.
  6. Scroll to and touch Download Manager.
  7. Touch the Clear data button. goo.gl/PT37PN
  8. If prompted, touch OK on the warning that all the saved information will be deleted.
  9. Press the Back key. goo.gl/PT37PN
  10. Scroll to and touch Market. goo.gl/PT37PN
  11. Touch the Clear data button. goo.gl/PT37PN
  12. If prompted, touch OK on the warning that all the saved information will be deleted.
  13. Press the Home key. goo.gl/PT37PN


For G2:
  1. From the Home screen, press the Menu key.
  2. Touch Settings.
  3. Touch Wireless & networks.
  4. Touch Mobile networks.
  5. Verify that the Data enabled check box is selected. If it is not, touch it to select.
  6. Verify the Use only 2G networks check box is cleared. If it is selected, touch it to clear.
  7. Press the Home key.
For myTouch 4G:


  1. From the Home screen, press the Menu key.
  2. Touch Settings. goo.gl/PT37PN
  3. Touch Wireless & networks.
  4. Verify the Mobile networks check box is selected. If it is not, touch it to select.
  5. Touch Mobile network.
  6. Touch Network Mode.
  7. Touch GSM / WCDM auto.
goo.gl/PT37PN

  1. Remount and re-insert the memory card.
  2. From the Home screen, press the Menu key.
  3. Touch Settings.
  4. Touch SD card & phone storage or SD & phone storage.
  5. Touch Unmount SD card.
  6. Wait for the phone to say the card is unmounted.
  7. Remove the memory card. Insert and remove memory card - myTouch 4G.
  8. Re-insert the memory card.
Perform a soft reset.
Open the Play Store and attempt the download again.
If the problem continues:
The problem may be an intermittent error on the Google servers. Wait a few hours to see if it improves.

OR

See Play Store help from Google or contact Google at http://support.google.com/googleplay/?hl=en

Monday, September 8, 2014

SPD 6820 8810 SCI Android Usb Driver Download

china android mobile 6820 usb driver 
china android mobile 8810 usb driver haldwani
samsung copy mobile phone using 6820 spreadtrum
Download this Driver compatible for cpu 6810 / 8810 
Other Brand  Micromax Spice Intex Lava Karbonn 
Any Others To get This Driver  compatible With 
china android mobile 6820 usb driver 
china android mobile 8810 usb driver haldwani
samsung copy mobile phone using 6820 spreadtrum
Download this Driver compatible for cpu 6810 / 8810 
Other Brand  Micromax Spice Intex Lava Karbonn 

LINK 1 DOWNLOAD SPD 6820 8810 SCI
Link 2 DOWNLOAD 64bit 32bit 

Friday, April 4, 2014

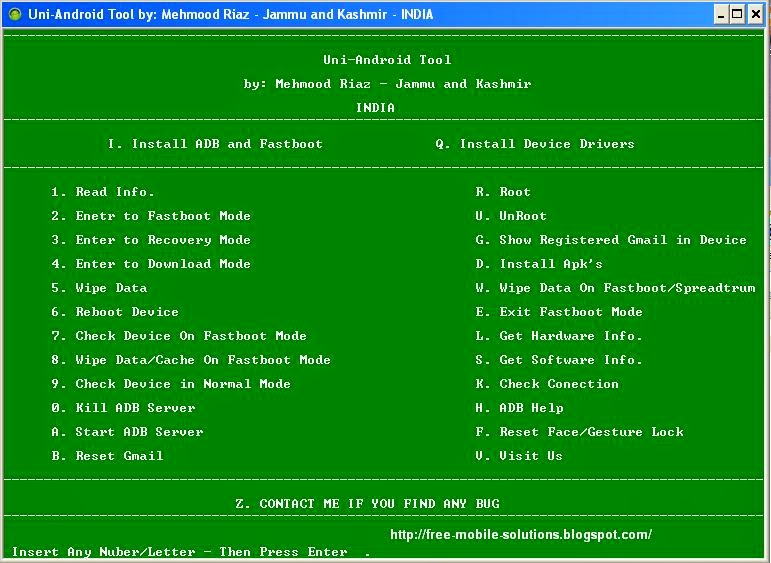
Universal Android Tools v 6.0 2015 Download

universal android free-mobile-solutions tools 2014
Uni-Android Tool V-3.01 Multi Root free-mobile-solutions Tool for Androids
Uni-Android Tool V-3.01 Multi Fastboot mode free-mobile-solutions Tool for Androids
Uni-Android Tool V-3.01 Adb  Tool free-mobile-solutions for Androids
Uni-Android Tool V-3.01 Install Apk free-mobile-solutions Tool for Androids

universal android free-mobile-solutions tools 2014
Uni-Android Tool V-3.01 Multi Root free-mobile-solutions Tool for Androids
Uni-Android Tool V-3.01 Multi Fastboot mode free-mobile-solutions Tool for Androids
Uni-Android Tool V-3.01 Adb  Tool free-mobile-solutions for Androids
Uni-Android Tool V-3.01 Install Apk free-mobile-solutions Tool for Androidsuniversal android free-mobile-solutions tools 2014
Uni-Android Tool V-3.01 Multi Root free-mobile-solutions Tool for Androids
Uni-Android Tool V-3.01 Multi Fastboot mode free-mobile-solutions Tool for Androids
Uni-Android Tool V-3.01 Adb  Tool free-mobile-solutions for Androids
Uni-Android Tool V-3.01 Install Apk free-mobile-solutions Tool for Androids


Download now Universal Android Tools   

DOWNLOAD ANDROID APP   

Thursday, February 27, 2014

Spectrum Cpu imei Repair tool With Tutorial Free Software Download Mediafire

Here is the good imei tool for All spd phones Easy to use and work 100% all Spd phone
Normal mode Imei Repair

Power on Phone
Enable Usb debugging mode
Connect phone to PC
Select port
Press Mode select
Set "Normal mode"
Write imei
press write
Calibration Mode Imei Repair
Take usb cable and cut the vcc connection ( Red Colour Vire )
Press Mode select
Set " Calibration Mode "
Write imei
Connect Usb cable without battery
Press write
Inset battery
Here is the tool link :- Spd Imei tool

Tuesday, May 29, 2012

HTC DROID INCREDIBLE 2 HARD RESET PROCEDURE

The HTC DROID Incredible 2 General Info:
2G Network     CDMA 800 / 1900
                GSM 850 / 900 / 1800 / 1900
3G Network     CDMA2000 1xEV-DO
              HSDPA 900 / 2100
Announced     2011, April
Released        April 2011, 

Note: Just make a back up copy of all of the important data stored or installed on the HTC DROID Incredible 2 before proceeding. The result of these process will delete and wipe all data that is stored on the device. However, this may or may not harm the data stored on the microSD card. 

HTC DROID Incredible 2 factory reset on Menu Settings:

   1. On Home Screen, select MENU
   2. Select SETTINGS, select PRIVACY
   3. SElect FACTORY DATA RESET
   4. Select RESET PHONE
   5. If password is promted enter it... , Then select ERASE EVERYTHING

HTC DROID Incredible 2 Reset Application: This may help to forcely stop abnormality of an Application installed.   

   1. From a home screen, select the applications tab (located in the lower left).
   2. Select Settings.
   3. Select Applications.
   4. Select Manage applications.
   5. Select the appropriate application.
   6. Select Force stop.
   7. Select Clear data.
   8. Select OK.

HTC DROID Incredible 2 Hard Reset... A full reset procedures to clear all data and restore thed device to default factory settings. This may help for a severe problems like hang freezes or frozen devices. 


   1. If the HTC DROID Incredible 2 is frozen, Shut the device POWER OFF., take the battery out from the device and reinsert back again. 
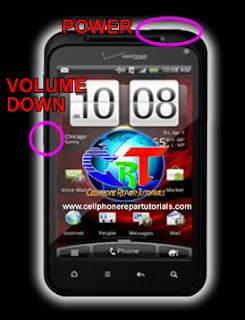
   2. Hold the VOLUME DOWN BUTTON  then Press and hold the POWER BUTTON until the device turns on
HTC DROID Incredible 2 Hard Reset procedure picture guide
   3. Wait until this menu appears: Fastbook, Recovery, Clear Storage, and Simlock
   5. Select Clear Storage using  the Volume Down button
   6. Press and release the Power button
   7. Select: Volume Up for YES and Volume Down for NO


After the hard reset process completes, the HTC DROID Incredible 2 will then reboot and it will return back to its factory fresh state settings

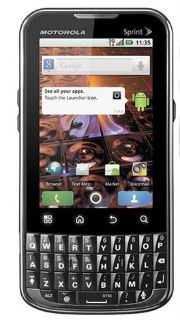
MOTOROLA XPRT HARD RESET, WIPE DATA CACHE AND RESTORE TO ORIGINAL FACTORY SETTING

Here's the step by procedure on how to Factory reset Motorola XPRT to wipe data cache and restore it to original factory default settings. Just follow the simple instruction below, and please back-up all important data stored or installed on the device before proceedings.. 

Motorola XPRT Factory Reset through Menu Settings: This will simply Reset your device into factory default settings.

From the main HOME SCREEN, 
->select MENU 
->select Settings, 
->select PRIVACY
->select FACTORY DATA RESET
->select RESET PHONE
->Enter PASSWORD if prompted
->select ERASE EVERYTHING

 Motorola XPRT Hard reset through button combination, this will prompt you into recovery mode.
this may help if the Motorola XPRT is frozen,hang or unresponsive. 

   1. Turn the power off or remove the battery and reinsert it back again after a couple of seconds. 
   2. Press and hold the POWER+CAMERA buttons together
   3. Release the Camera button when prompted
   4. Press and hold the Volume Down key
   5. It will show a yellow exclamation mark
   6. Select the Wipe data/factory reset (Alt + W) option

Hope this may help.. Enjoy!

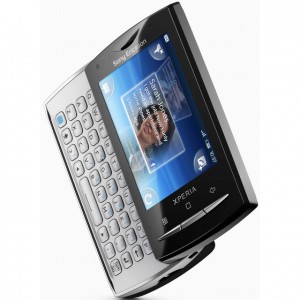
FIX HANG FROZEN PROBLEM FOR SONY ERICSSON XPERIA X10 MINI PRO: HARD RESET

This a simple guide on how to hard reset  Sony Ericsson Xperia  and restore the device to its original factory default settings. This may also help to fix the said android smartphone if suffered severe hang or freezing problems. This may work on Sony Ericsson Xperia Mini, Mini Pro, X10 Mini and X10 Mini PRO. 

Note: A hard reset process will wipe or delete the data stored on the device, so make sure to back of all important files you've installed or stored on the phones memory. However, this may not harm the files stored on the microSD memory card.  

Factory Reset by Settings:
This can be done from Main Home Screen
then select SETTINGS, then PRIVACY
select FACTORY DATA RESET and then RESET PHONE
then choose ERASE EVERYTHING

This will wipe the present settings and then restore back the device to its factory settings. 


If your Xperia X10 Mini or mini Pro experienced Hang or Freezing problem.
Sometimes you may just stuck on the start up logo, this may help if you can't access or get through to the home screen. If this happens you may reboot the phone by way of pressing button combination and do a hard reset.

- Turn the power off or remove the battery out and reinsert it back again.
- Hold the Left and right buttons found beneath the LCD display
- Briefly Press and release the Power button
- Follow the steps on-screen  to hard reset your phone 

If somehow if the hard reset will not fix hang or frozen problem, the only and final option is to restore or flash the phone's original stock ROM or firmware.

T-MOBILE SAMSUNG EXHIBIT 4G SGH-T759 HARD RESET/WIPE DATA FACTORY RESET PROCEDURE

samsung exhibit 4g hard reset
Here's a step by step guide on how to Factory Reset the Samsung Exhibit 4G by T-Mobile. This may help if having unwanted issues using the phone like, freezing, hang on logo, become laggy on some applications etc. And or if you just wanted to restore it back to it's original factory default settings. 

Note: This process will wipe all data stored on the phone. Just make a back up copy of all important data store on the phone (use any back up application from android market) before proceeding. 


Factory Reset from menu settings:

- On the main home screen,
- Tap Menu
- Tap Settings, then Privacy
- Tap Factory data reset
- Tap Reset phone
- Tap Erase everything to confirm

Samsung Exhibit 4G Hard Reset by button combination:
This can be done if the phone is frozen or just stuck on logo.

- First turn power off or pull the battery out and reinsert it back again
- Hold the Volume Down button then Press and release the Power button
 the device will boot into recovery mode
- Just select Wipe data/factory reset.

Then your Samsung Exhibit 4G will then reboot to factory fresh default settings. 

computer science course online | computer science degree syllabus | computer science help online | computer science learn online | computer science lectures online | computer science online course | cs final subjects | cs online school | degree computer | degree in programming | free computer classes online | free online computer classes | intro to computer science online | learn computer science online | learn computer science online free | mit computer science online | msc computer science online | online bachelor in computer science | online bachelor of computer science | online bsc computer science | online computer classes | online computer classes free | online computer coding classes | online computer coding courses | online masters cs | online ms in cs | online msc computer science | online projects for computer science students | programming degree | teach computer science online | what is computer science degree

Labels

brand new desktop computers
cheap refurbished laptops
computer desktop packages
computer discount
desktop computer new
desktop computer package deals
desktop computer packages
desktop pc package deals
desktop pc packages
discount computer parts
discount computers
discount desktop computers
discount laptop computers
laptop computer sales
laptop computers for sale
laptop sale
laptops for sale
new computer desktop
new desktop
new desktop computer
new desktop computer with windows 7
new desktop pc
new pc desktop
new windows 7 desktop computers
pc desktop package
refurbished computers
refurbished desktop computers
refurbished laptops
refurbished notebooks
refurbished pc
used laptop for sale